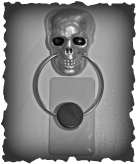
Looking for a cute little addition to a doorway's decor? Well why not try to make this easy door knocker or as I like to call it a doorbell knocker since it's positioned right over my buzzer. I will admit I rang my own doorbell a few times to try him out and then just for fun.
It was a good addition to my Halloween decor, the kids really seemed to like tapping on the knocker before entering our spooky hallway. We eventually started getting mentioned to other kids so after the first hour we were asked if we were the haunted house that everyone kept talking about for the towers.
It was a good addition to my Halloween decor, the kids really seemed to like tapping on the knocker before entering our spooky hallway. We eventually started getting mentioned to other kids so after the first hour we were asked if we were the haunted house that everyone kept talking about for the towers.

So for this little project, you will need to pick up a cheap plastic skull, a towel ring or ring of some sort, 180+ grit sandpaper (the finer the better), a knocker (I used a Captain Morgan's Private Stock bottle top, which was made with wood and cork), and some paint. I would recommend a drill but it isn't necessary if you don't mind manually drilling holes. I apologize for not taking a better picture to show where I set the holes for the towel ring. When figuring out placement find a spot just behind the teeth, and don't put it too far back or it may catch and not swing easily.
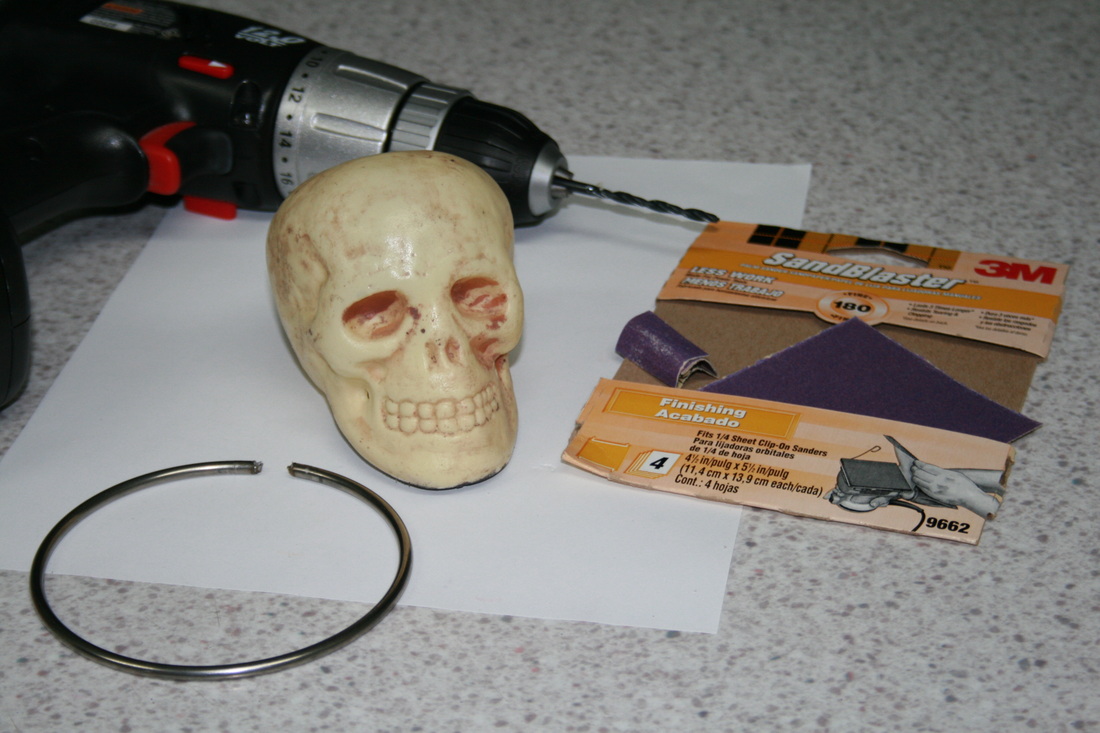
Once the holes have been drilled for the towel ring, use cutters to cut the towel ring (I used bolt cutter). You will need to drill another hole for mounting, I was able to drill a hole in the back of his head and then I used a stick on hook to mount to the wall making mounting super easy. Remember to lightly sand any seams on the plastic to help the skull look nicer. Now paint the skull whatever color you want adding any addition accents like eyes, etc.
When it's finished drying you will now be ready to start assembling, bend the towel ring and stick one side through the holes in the jaw area of the skull. Turn until the open part of the ring is centered down, then take the cork part of the bottle cap and push the ends through to meet up. If you bent the bar too far, bend it closed and then try to run through the cork. It should meet up in the middle and stay in place without needing to be glued.
When it's finished drying you will now be ready to start assembling, bend the towel ring and stick one side through the holes in the jaw area of the skull. Turn until the open part of the ring is centered down, then take the cork part of the bottle cap and push the ends through to meet up. If you bent the bar too far, bend it closed and then try to run through the cork. It should meet up in the middle and stay in place without needing to be glued.

On to the part using the stick on hook, place hook through the hole drilled in the back of the skull. Position the skull where you want, remove the sticker and then press firmly, be careful not to crush the skull. My skull is rather fragile and bends super easy so I removed it once I had the hook in place so I could push hook in place more firmly. Depending on the type of stick on hook used you will need to clean the surface and the waiting time for use will vary before you can put the skull back up. I waited about fifteen minutes and my hook was set, then the fun began...

I rang the doorbell using my cool new skull knocker and drove poor Saphira nuts. Then when the husband came home he decided he needed to try it out (that and he wanted to drive poor Saphira nuts as well).
Note: the skull that I used is about five inches tall and the ring is about six inches. Hope this helps inspire you!
Note: the skull that I used is about five inches tall and the ring is about six inches. Hope this helps inspire you!