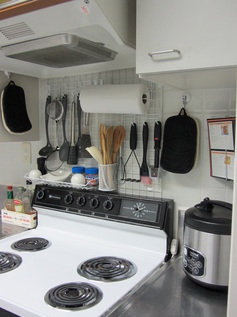
One tough thing about apartment living is the smaller kitchens and the limited counter space. I am a person who goes nuts when the counters are too cluttered. I feel like my small space just became microscopic when I have things on the counter. So with the help of my local Daiso (dollar store) and 3M with their incredible removable hooks I created a clutter free cooking area on a tiled surface. Now if I had a dry walled surface I would have used the hooks that go with the grids but you work with what you have right?
Materials Needed:
(2) white coated wire grids 13" x 25" (the grid size will vary depending upon space)
(4) 1-3lb Removable 3M hooks
(4) Cable Removable 3M hooks
Hooks for your cooking utensils
Holders/baskets for additional options
Light weight cook book holder
(2) Pot holder hooks (I used suction cup hooks which I regret every now and again since they like to fall off the cupboard)
Let's get started!
First clean the wall with a cleaner that will not leave a residue (like Windex or rubbing alcohol). Next measure the wall and center the grids mark where the 1-3lb hooks need to be, then mark for the cable hooks. Remember when marking the hook placement it is easier to have the hooks holding the grid and marking them in place. So I usually hook the grids with where my hooks should hold it, then place it on the wall and mark. I found that using a pencil or white board marker was easiest, for the cable hooks you can simply draw partially around them, on the 1-3lb hooks mark at the top and bottom, set the grid(s) aside. Follow the 3M hook instruction for applying and place hooks on the wall (they will need at least 30-45 minutes to set).


Once the hooks have set start to hang up the grid and begin arranging your perfect cooking utensil wall. I have probably rearranged mine at least three times, using different hooks and racks to change things up every now and then. I just recently add the cook book holder which is fantastic. It keeps my cook book away from any possible messes and better yet its not on the counter. I also have a tablet holder that hangs onto the inside of the cabinet for easy removal.


Now you should be done, so step back and marvel at your new and improved cooking space. This whole project cost me about $15.00, not bad right? So now enjoy!