Customizing the plain old tee, a simple and quick way to do this is with bleach. I decided to test this out with a nice inexpensive pack of Fruit of the Loom t-shirts. Now there are a couple of ways to do bleached designs, you can use a bleach pen, toilet bowl cleaner, and plain bleach (each product I tried was Clorox brand, but any brand should be fine).
For these shirts I used straight up bleach, a small paint brush, a ceramic bowl, tailors chalk, and Rubbermaid lid from one of my storage totes to keep the design on one side. Let's begin!
Step 1: Take tailors chalk and outline or sketch out your design. Now if you make a mistake no worries you can lightly rub/smear it out and go back over it. The chalk will not cause any issues with the bleaching process and is only temporary, it will come out in the wash. So sketch/trace away, and when you are finished grab that tote lid, piece of cardboard or whatever you have.
Step 2: I used a Rubbermaid lid but you can just as easily use cardboard with some aluminum foil wrapped around it. Pull the shirt over the lid tucking the excess fabric under the lid, including the sleeves (unless you would like bleach splatters as part of the design). Just a thought they used to make shirt forms if they still do that might be a good option as well for this step.

Step 3: Pour a small amount of bleach in a small cup/bowl. When dipping your paint brush in the bleach wipe some of the bleach off. Depending upon your design you may want a thin line or thicker line so you can use different size brushes or wipe excess off, either works. If you feel you need more time to work on the design try diluting the bleach with some water, be careful not to add too much though.
Step 4: Lightly brush over your design, you do not need to saturate it (remember bleach will eventually eat through the material). The longer the bleach stays on the material the lighter it will get and vice-versa.
Step 5: Once you have finished bleaching your design and are happy with the color rinse the shirt with cold water and then throw it in the wash. Follow the shirts' care instructions, after the shirts are dry you are ready to show off your artistic skills.

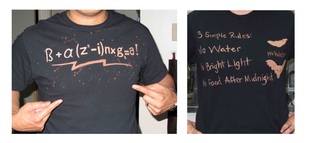
My husband is proudly showing off his support for one of his favorite shows with his new "Bazinga" shirt. Yes, he is making a strange face just for me since he loves to be silly and strange. I decided to make one of my favorite movies with a Gremlins themed shirt. I figured the theme would make an awesome workout shirt.

Note if you are wanting to try this out with a bleach pen, I have a few words of caution. First off the bleach pens seem to run more and cause a blob effect. I found that this method is best used with the use of contact paper to help keep things from bleeding or running.
Also when working with any of these bleach based products make sure you are in a well ventilated area, eye protection is recommend just in case of splashing. I was tempted to wear a mask with the bleach pen since it seemed to have a much stronger odor and required more time to create the desired look.
Also when working with any of these bleach based products make sure you are in a well ventilated area, eye protection is recommend just in case of splashing. I was tempted to wear a mask with the bleach pen since it seemed to have a much stronger odor and required more time to create the desired look.